 100% sécurité garantie
 TL;DR:
Pour vider rapidement le cache et l'historique de Google Chrome sous macOS 10.15, utilisez le raccourci clavier Maj + Commande + Supprimer afin d'ouvrir directement la fenêtre permettant de définir une plage horaire et de supprimer les images et fichiers en cache.
● L'option de suppression est également accessible manuellement en sélectionnant Effacer les données de navigation dans le menu principal de Chrome ou via la section Plus d'outils.
● Vous pouvez empêcher définitivement le stockage de nouveaux fichiers en cache en ouvrant les outils de développement (Commande + Options + I) et en cochant Désactiver le cache dans l'onglet Réseau, à condition de maintenir cette fenêtre d'outils constamment ouverte au bas de votre écran.
Demandez un résumé à l'IA
 ChatGPT
 Perplexity
 Gemini
 Claude
 Grok
Grok
Cached files contain data from visited pages, which your system re-presented to you more quickly in place of a live page when you revisit the sites. However, your cache files accumulate as quickly as you open new pages on your browser, building up clutters in your system.
You may also need to purge all your old Chrome user data on Mac OS 10.15 so that you can load live pages when you revisit old sites. Read on to find out three easy ways to purge all your old Chrome user data on Mac OS 10.15.
How to Clear Cache & History in Chrome for macOS 10.15
Method 1: Use a Keyboard Shortcut
1. Open Chrome, and then press the “Shift + Command + Delete” keys. This brings up a new browser tab with a pop-up window.
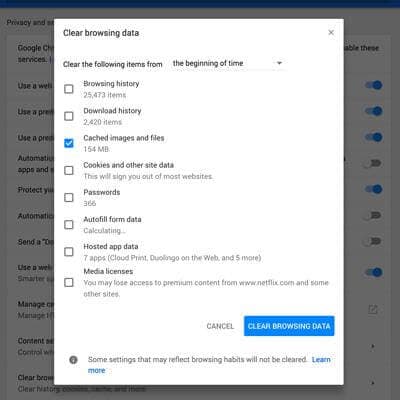
2. Open the drop-down menu at the top and then select the time range for the cache files you want to delete (hours, days, weeks, months). You can select “the beginning of time” if you want to clear out all your cache data.
3. Now, check the ”Cached images and files” and the “Browsing history” boxes, and then tap on the “Clear browsing data” button.
And that’s it, your cache files will be booted from your system in a snap, and you can then reload websites to get a fresh copy of their pages.
Method 2: Use Chrome’s Main Menu
1. Select “Chrome” in the main menu, and then scroll down and select the “Clear Browsing Data” option.

2. On the next window that pops up, you’ll find easy-to-follow prompts. Follow the prompts, and reenact step 3 from Method 1 to clear out your old chrome user data, including your browsing history.
Method 3: Use Chrome’s Settings Menu
1. On an open browser window, check for three dots in the upper right corner next to your URL bar. Now, select either the “More Tools” or “Settings” option.
2. If you selected “More Tools”, you’ll find a “Clear Browsing Data” option on the next page. Click on it. This brings up options similar to those of step 3 in Method 1. Simply proceed as directed in that step.
3. If you selected “Settings”, navigate to the “Show advanced settings” option near the bottom of the screen, and then click on the “Clear Browsing Data... “ button on the next page.

This brings up options similar to those of Method. Simply proceed with step 3 of Method 1 from here.
Method 4: Permanently Disable Cache on Mac OS 10.15 Chrome
If you don’t your cache filling up again after you’ve cleared it out, you can permanently disable it.
To do this,
1. Click on the three dots next to the URL bar, and then select “More tools > Developer tools”. Alternatively, you can press the “Command + Options + I” keys.
2. On the Dev Tools window, click on “Network”, and then check the “Disable cache” box.
You’ll find a notice in the window that says the Dev Tools window must be kept open at the bottom of your screen in order to keep the cache disabled. But you can drag the bar down to free up more space on the upper part of your browsing screen.
 100% sécurité garantie 100% sécurité garantie 100% sécurité garantie
 Learn more about PDFelement for Mac >>


Clara Durand
staff Éditeur